We have realized that there are many people who for one reason or another need to generate 3D models of certain letters. From Bitfab we have shown you many alternatives to generate your 3D models without the need to design them yourself. Below we leave you a series of articles that you may want to read after this one:
- The best sites to download STL files: in this article we explain where to look for 3D models to download
- Convert a 2D image to 3D: Here you can find a tutorial on how to convert a 2D image to a 3D model. We will refer to this article later
- Customized keychains, how to make them?: Here we show you a very simple way to generate key rings with text.
Based on these previous articles and new content we will explain a few ways to get 3D letter models you’ll like.
Create 3D letters from an image
In our article Convert 2D images to 3D we show you how to convert any image to a 3D model. The main method described in this tutorial works especially well with high contrast images and well defined geometries. Don’t you think the letters fit perfectly here?
Well, following the article that we have left for you above, you will be able to create in a very simple and fast way your 3D model from an image of the letters that you want. It is possible that you already have the image of the letters you want to convert to 3D, as in the case of a famous logo with text. But we also want to give you the tools to generate an image of any text with the typography you want to create your 3D model. Yes, you heard right: you will be able to generate a text using the most popular font styles and that you like the most using fontmeme. And the best of all is that it is totally free.

It is very easy to use this text generator. All we have to do is go to the aforementioned website and look for a font that you like. At the bottom of the resulting page you will find a window similar to the one we show you, where you can customize the text to your liking, choosing color and font size.
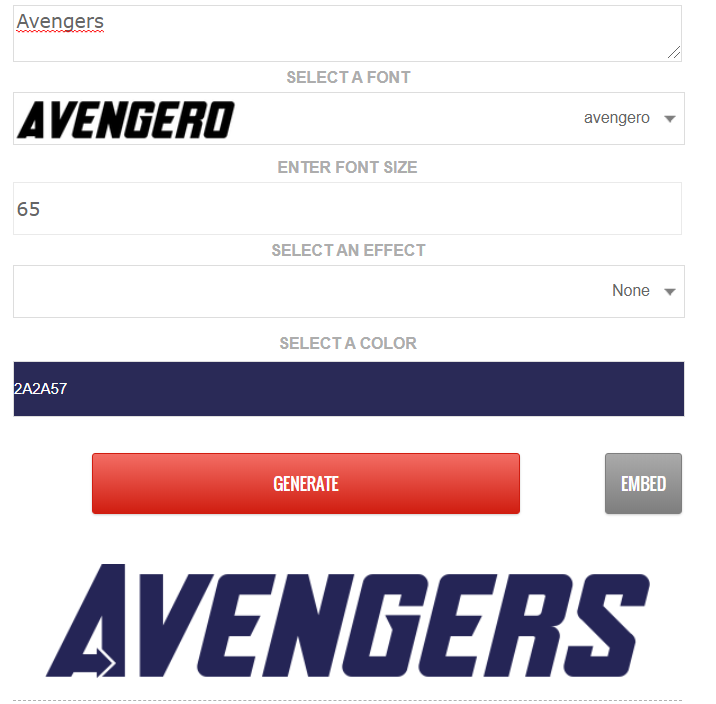
Once the text has been generated, right click on it to save the image. Now we only have to follow some of the methods proposed in our post to convert a 2D image to 3D to create our ready-to-print 3D model. If you are an Avengers’ fan, for sure you love this example, because with this system you can get something as cool as this:

Another positive of using this page, is that it has a font search engine. In it we can search for any type of font we want, and we will get results from fonts that are on the page itself or from other users’ posts linking to external sites. It is quite the powerful tool, since it allows us to access not only the catalogue of this page itself, but it also compiles the knowledge of a lot of users.
Let’s say, for example, that we are looking for the typography of the tremendously awaited Netflix series: The Witcher. If we use the search engine, we’ll see that this font is not in the page’s catalogue, but we find a post by another user where we link to another website where we can find a text generator with this font.

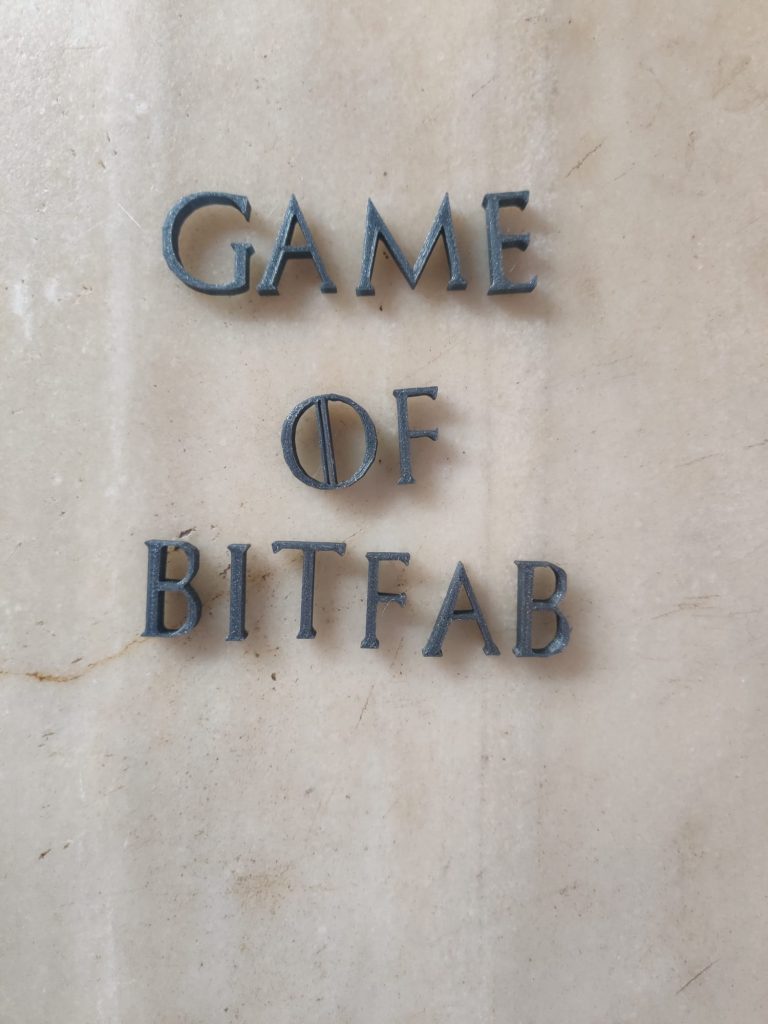
As you can see this method is easy and gives excellent results with very little effort. The truth is that this method is so good that we would love to see what you have created. Don’t hesitate to post a picture of your 3D letter models, because we love to see your ideas come to life. Here’s an example (spoiler: you’ve seen it on the cover) of what can be done with this method:
Create a 3D text with Fusion360
The method proposed in the previous section is great for the vast majority of users, but you may need something more advanced. If this is your case, you are in luck since we are going to show you the steps you have to follow to create 3D text in fusion 360.
First of all, download the font you want to your computer. For this we can use a page like dafont. In this web we must look for (either using the search engine or the filter by categories) a font that we like and click on download.
There are lots of websites to download fonts for free, so try googling the font you want if you can’t find it on dafont.
Install the font in our computer. This step is very easy so don’t panic. Just type “fonts” in the Windows search engine and click on “font settings”. Here we only have to drag the file of the font where it indicates us and the font will be installed.
Once the font is installed, we can use it in any program as if it were another font, such as Arial or Calibri. From here we can use any text editor, such as Word, to write the text we want, save it as an image and proceed as we have done in the previous case.
To use our font in fusion 360 we will have to use the text tool (it appears inside the sketch menu with the icon of an A). We can create text of the size we want, and we can use it as it is or include it in our designs.
Although it is a simple process, here’s a video that explains the process:
This method is quite powerful, and will allow us to integrate any text we want, in a huge variety of typographies in our 3D designs.
Conclusions
In this article we have learned how to create 3D text, either from a photo or using our own generated text. It is very easy and you have seen that you can get very cool results that will be the envy of your colleagues.
Don’t hesitate to share your creations, because we use this method often and we want you to do it too.